WHAT IS SPACE PLANNER?
Space planner is a tool written in HTML 5, CSS and JavaScript.
This tool allows the user to choose:
-Room size (scaled by 1:50/ 1:25) with a max 13,3 x 12,2m or 6,61 x 4,43 m
-Flooring of the room
-Position of objects within the room
- Price and brand of each furniture piece
-Get the overall price once done
-Take a screenshot of final product
It is possible to fit the tool itself in any given website just by adding canvas tags and the javascript external
file.
Although most of the features are achieved thanks to a clear and commented JavaScript code, css and html
are useful for some others skills as well (such as download elements, give canvas borders and remove
annoying and unwilled drag and select actions).
The whole is purely written from scratch, no external libraries or API imported, only pure native canvas API.
This tool sits on a General Public License which can be found more about on the README file or in the code
itself.
HOW DOES THAT WORK FOR THE USER?
The logic behind the whole code is fairly easy:
- The user is asked to size the room as upon his desires
-Variables such as Width and Height and square meters (guessing a 3m roof) are always tracked while
deciding.
-The intention of the user is checked through a simple banner.
-One door can be placed at any time either on the right or on the left hand side of the room, the door also
shows the door range once opened, so that the user remembers to not to put element on that bit of the
room. The whole door operation is triggered by a door interactive button (always on the right menu).
-If the user wishes the size to be scaled in a different way, it can be accomplished simply by clicking two
arrows buttons near the scale indicator.
-When decided the room will be centered in the screen so that the user can start work on it.
-At any time the user can also decide to change color of the floor (it can be either a RGB color or a picture).
-On the bottom right a menu will appear if the user clicks on one of the four buttons (Kitchen, Livingroom,
Bathroom, Bedroom).
-Now, each one of these buttons will make appear a different list of elements, which can be scrolled by
clicking the up-arrow button or the down-button one.
-At the right hand side of each product its price and its brand are shown.
-When an element is clicked it can be dragged around all the page, but dropped only in the “user room
space”.
-The price of the element will be added to the overall amount.
-Once the user is happy with size, floor color, price and number of elements, he/she can decide to take a
screenshot of the canvas with a button placed on the top right corner of the WebPage (the button icon
should suggest its functionality).
GENERAL ADVISES
This version of the tool is not completed yet; it is just the skeleton of what it could be. I have not worried
about graphic element, but everything is really easy to be implemented, most of the coordinates are
variables and not hard coded, everything is made out in order to be implemented in the future.
The elements are NOT sorted by categories, that is just an example that says “It could be this way”, I didn’t
have enough patience to sort them in the right way, but would take 5 minutes to be done.
HOW EVERYTHING ACTUALLY WORKS:
Here it comes the tricky part:
Because the tool needed to be created all in native canvas API, some tasks requested me a fairly big
amount of time and this is how I found my way arround: for each function I’m going to explain what it does
and hw it does it.
This should be clear enough:
HTML:
The HTML of my tool is really basic, it only contains two div tags and an alert in case the browser is
not supporting the canvas element.
One image is imported from HTML and put in the navbar (far right) as a button for downloading.
In a h tag I put the title.
CSS:
Setting border of my canvas.
Setting navbar alpha blend and color.
Setting values for button (clickable and undraggable).
Setting font size and position of the title.
Setting text to be unselectable.
JS:
1. Set Canvas height and width.
2. Set its context to be in 2 dimensions.
3. Draw a rectangle using the mouse coordinates as final point of it, so make it dynamic and changeable.
4. The value of the rectangle are first converted from px to cm and then from cm to meter using a scale
1:50 by default, but the user can still decide to have a 1:25 scale which allows him/her to have a bigger
room with a different value in m.
5. If the user clicks into the area assigned for drawing, a banner will check if the click was by mistake or
not.
6. If the user has finally decided the rectangle final points are not mouse coordinates anymore but are
fixed value from now on. Otherwise it will just go back to the size decision.
7. The menu on the right is half hided while the user is deciding.
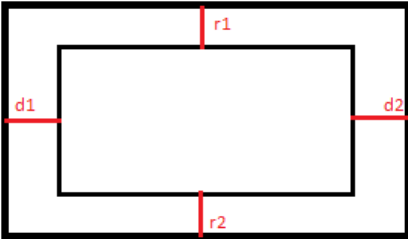
8. The rectangle itself is centered by calculating
the distance between the canvas and the room itself,
once the two distances are equal the rectangle stops
moving.
(Eg: when r1 = r2 && d1 = d2, set the speed that was
pushing my rectangle to 0)
9. Once the user has decided the white rectangle that was covering the bottom side of the menu will be
removed and the menu is now fully displayed.
10. The user can decide to choose the color of the floor, if it is a color it will be accomplished by drawing a
rectangle of the same size of the room, if it’s an image it will be displayed at 0,0 of the ROOM with
H&W same as the room.
11. Going down on the menu we will see four buttons that highlight when the mouse is on it, this is a kind
of tile based menu, but is really accomplished and drawn by creating an object and changin this.color to
a different one everytime is on a tile.
The four tile are drawn with a four loop, since just one is initialised in the object function.
From now one it gets more complicated:
Basically in order to handle 20 pictures of furniture, display them and store them I’ve been trough a
lot of trouble.
This is the logic:
12. All the images are stored in one big array, with no differentiation between what kind of forniture that
is.
13. Then a object function is created and some parameters (as width, height, id ecc.) are set.
14. A draw function is called for the object
15. Then if the kitchen is clicked (let’s say clicked = 1), this.draw will draw all the images looping trough
each id, everytime the id changes, the image.src changes as well and another image is displayed spaced
by a variable value.
16. So it happens everytime another button is clicked.
17. The cool thing is that everytime I loop through a series of image (eg. All the kitchens objects) I also push
all the elements displayed in that case (clicked = 1 || 2 || 3 || 4) in other four different arays (Kitchen,
Livingroom, Bathroom, Bedroom); have them both in one big array and in four different will come
usefull for drag and drop.
18. Now because there is space just for two images at the time, I put two buttons that change “page”,
everytime page changes the image changes as well following the easy order of kitchen[page].
19. I also give them price and brand, this are stored as well in four arrays (eg. Pricekitchen[]), and is looped
through them in the same way Pricekitchen[page].
20. It might seem that images an prices are not linked, but if we take Kitchen[], kitchenprice[] and
kitchenbrand[] and we mix sort them in the same way, we then obtain a kind of database
(implementation for MySql database is written in this documentation as well).
This last part took me ages to be figured out:
21. Drag and drop of images is accomplished with no external library (although there are plenty of them),
the way I have tought it is:
21.1. If the user clicks on the image then is also allowed to change image size by clicking arrow up
and down button of the keyboard.
21.2. If an image is clicked, the other instance of the same image is drawn at mouse coordinates
and so is possible to move it arround the page.
21.3. Once the user has clicked the final position of the image it will be drawn there instead of
the mouse x and y
OVERALL AUTO-EVALUATION
Space planner is not completely optimised, the code is sometimes messy and the not possible usage of
external libraries made everything a way more complicated and less efficient.
Keep working on this project is definitely one of my goals, I do feel that this project can have some possible
implementations.
POSSIBLE AND FUTURE IMPLEMENTATION
Possibility to have more than one door and make everything more interactive with user.
Smarter usage of css and html instead of pure JavaScript.
Interactive menu.
Straight creation of a database from datas within the menu
Possible MySql protocoding:
Use kitchen[], livingroom[], bedroom[], bathroom[] to be four different coloumns of four different
tables.
Match kitchenprice*+ … with the above tables and create a new column for each table.
Do the same for kitchenbrand*+…